

How To Use The Burn Tool In Photoshop

Introduction to Burn Tool in Photoshop
Adobe Photoshop is employed by many, including visual artists, Photo studio graphics, graphic artists, web designers, VFX artists, and gaming artists, to edit the image as it offers them great tools. Burns tool is one of them, it aids the user while adding dark shades or adding detailing on the image like shadows, light focusing, shades to the picture with multiple layers, and ensures that the source image is not affected while also saving time. It is one of the safest and the best tools to be used in Photoshop.
Where is the Burn Tool Available in Photoshop?
Burn tool is present in the toolbox as shown below; the shortcut is "o" to use the tool.

The top bar properties help in changing the tool behavior, configure the properties and start working.

How to Use Burn Tool in Photoshop?
The burn tool helps to add depth to the selected portion of the image. Below we have discussed it in more detail. There are few more smart ways to work on the burn tool by making the layer copy and applying burn effect to newly created lay; by doing this, our original layer will be safe, and we can drag it whenever needed. Burn tool applies darkness to the portion of an image which is selected using a brush. The more we run the brush, the more the area gets darker.
Properties of brush and burn effects can be set after each flow of the brush. Many professional artists use this tool to add depth and detail to their image, which brings a more realistic look and feels to the viewers interestingly. Below we have pretty more examples and step-by-step process of using the burn tool, which helps understand the usage of burn attribution more clearly.
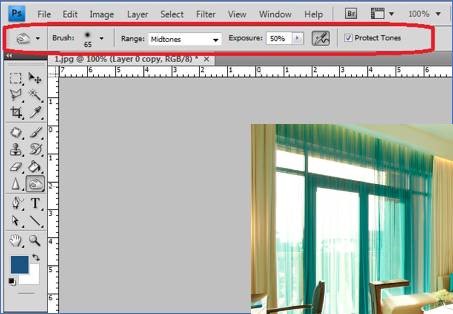
Step 1: Double click to open Photoshop or right-click on the Photoshop icon and select Run as administrator; let the application launch once the application is open, import, or open the image that needs to be burned select Burn tool which is present in the toolbar. After selecting this, we can see all the required attributions will be opened on the below menu tab.
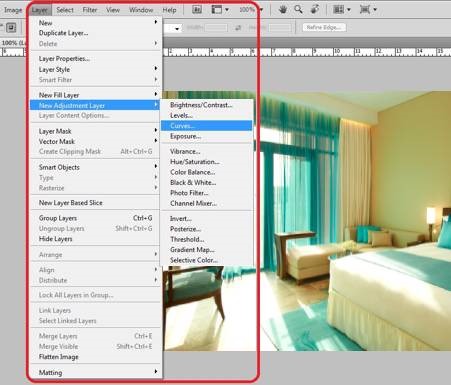
Step 2: Select the image and right click and select duplicate or use keyboard shortcut Ctrl + J; by doing this, we can see another layer with the same image gets loaded in the layer pane. We will be performing the burn edits only on the new layer, whereas the original loaded images remain the same. Select the newly created layer and click "o" to select burn or go to layers, select a new adjustment layer, and select curves.
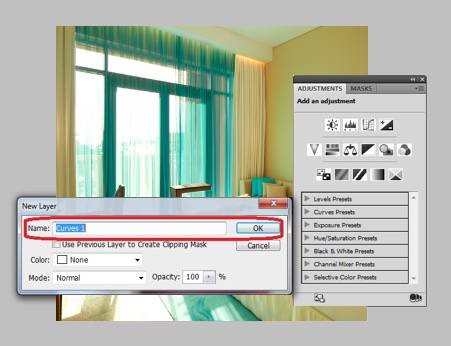
Step 3: A new curve layer window opens in which we can name our curve, give the name and click on "OK". We can see the layer now contains a curve as well as the burn mask with it. These both are going to help us in giving our detailing.
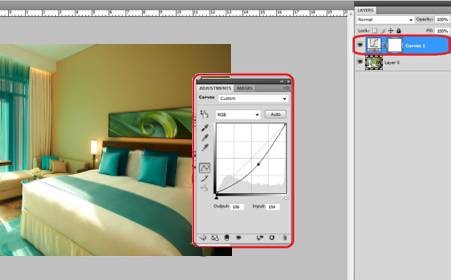
Step 4: The layer now contains a curve and mask. By double-clicking on a curve, the curve window opens where we can adjust the darkness and brightness of the complete image by moving the pointer. Practice and try this till the image reaches to the required color contractions.
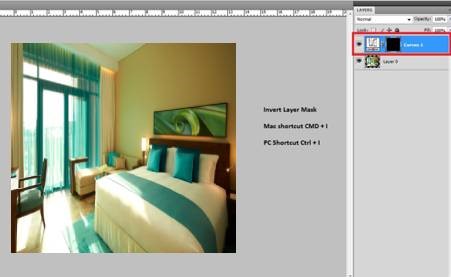
Step 5: Select the layer, and on the keyboard, click Ctrl + I; this process is called inversing layer mask. Where the mask color changes from White to Black.
Step 6: Select the brush and then set its properties and move the brush on the areas of the image where we need darks and detailing to be applied. If it faces the most commonly, we will be rolling the brush on the forehead, neck below eyes, etc. this completely depends on the output how you want to your image.

Step 7: After completing the brush and areas to be done, select images from the menu bar and click on Apply image. To apply the edits on the image.
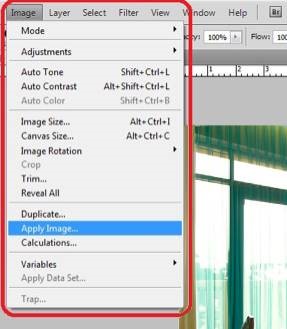
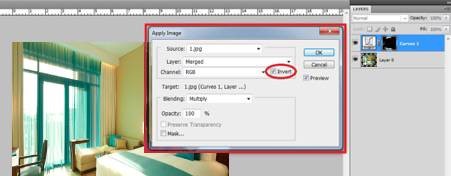
Step 8: We can see a window opens with the name of Apply Image, select the inverse option, and make sure it is ticked and click on ok.
Step 9:Open the curve layer and check with the darkness and color contrasts on the applied burn portion. The overall color adjustment must be done, and finalize your image.

Examples of Burn Tool in Photoshop
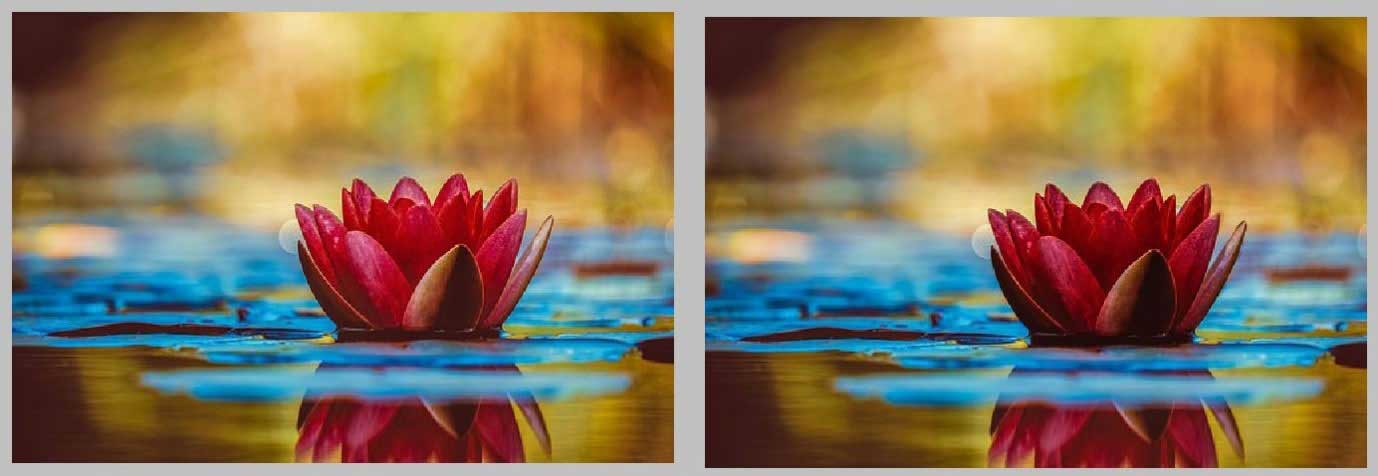
Now we will see a few examples:
Example: 1

Example: 2

Example: 3
Different Ways of Using Burn Tool
There are different ways to use the burn tool based on the image, and its detailing to be boring using the attribution. Duplicating the layer and directly selecting the burn tool, and applying the changes as required on the image. Once dons on a layer, this activity cannot be changed for any color adjustment and other viewing or properties changing process.
Duplicating the layer and adding an additional layer, applying curve and inverting the mask, and the process discussed above is more flexible to change the color combination and properties of the image like brightness and contrasts whenever needed output for visual realistic and feel.
To understand all these details and to get hands-on practice, we need to keep on practice or working with multiple images and use the properties as discussed and explore the differences of the image view at the end of the process on Photoshop as required.
Conclusion
We can make the image darker and add detailing on the image like shadows, light focusing, shades, and many more other important detailing to the image using the burn tool. Any visual artists, Photo studio graphics, graphic artists, web designers, VFX artists, gaming artists use this attribution for a more visual realistic look to their work.
Every individual who is interested, learning and using Photoshop must use this smart and easiest process to work on their requirements. One such tool is the burn tool which is very much useful, and by keeping our original image safe, we can perform edits. A smart and healthy way of editing can be done to save time and also to achieve good quality output with the flexibility to make changes whenever needed.
Recommended Articles
This has been a guide to Burn Tool in Photoshop. Here we discuss the concept and how to use the Burn Tool in Photoshop and a few examples. You can also go through our other suggested articles to learn more –
- Maya Tools
- Blender Tools
- Adobe Photoshop Tools
- Red Eye Tool in Photoshop
How To Use The Burn Tool In Photoshop
Source: https://www.educba.com/burn-tool-in-photoshop/
Posted by: toppandever.blogspot.com
0 Response to "How To Use The Burn Tool In Photoshop"
Post a Comment